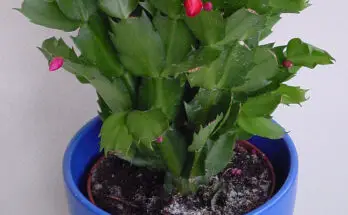
Hey, plant friends! If you’re like me, your Christmas cactus is one of those treasures you can’t get enough of—those vibrant blooms lighting up the winter months are pure joy. Want more of them? Propagating your Christmas cactus is the way to go, and it’s easier than you might think. Today, I’m sharing my favorite ways to multiply these beauties: cuttings, seeds, and a couple of bonus tricks I’ve learned along the way. Let’s dig in and get growing!
What Does Propagation Mean?
First off, propagation is just growing new plants from one you already have. For Christmas cacti, we’ve got options: snipping cuttings, planting seeds, or even splitting up a big plant. It’s like giving your cactus a chance to start a little family—and who wouldn’t want that?
Method 1: Propagating with Cuttings
This is my go-to method because it’s quick, simple, and almost foolproof. If your Christmas cactus is thriving, you’re ready to start!

- Step 1: Pick the Perfect Time
Spring or early summer is ideal—your plant’s in growth mode and bursting with energy. Skip this during blooming season, though; it’s too busy showing off those flowers!
- Step 2: Snip Your Cuttings
Find a healthy stem with 2-3 segments (those flat, leafy bits). With clean scissors—or even your fingers—gently twist or cut it off. I twist because it feels natural, like the plant’s saying, “Go ahead, take it!”
Quick Tip: If you use scissors, wipe them with rubbing alcohol first. Keeps everything clean and disease-free.
- Step 3: Let It Heal
Lay your cuttings in a dry, shady spot for 24-48 hours. The cut end will dry out and form a callus—think of it as a protective shield against rot. Patience here pays off.
- Step 4: Plant Them
Grab a small pot with drainage holes and fill it with a cactus or succulent mix. No fancy soil? Mix potting soil with some sand or perlite—works like a charm. Push the callused end about an inch into the soil, just deep enough to stand tall.
- Step 5: Water and Watch
Give it a light drink—moist, not drenched. Christmas cacti hate soggy roots, especially when they’re rooting. Set the pot in bright, indirect light (a north-facing window is perfect) and wait. In 2-4 weeks, you’ll see new growth or feel roots if you tug gently.
- Step 6: Nurture Your Baby
Once it’s rooted, care for it like its mama plant: water when the top inch of soil dries out, and keep it in that sweet, indirect light. Soon, it’ll be ready for a bigger pot—and maybe even a spot on your holiday display!
Method 2: Growing from Seeds
Seeds take more time, but there’s something magical about growing a plant from a tiny speck. Plus, it’s a great way to get a bunch of new cacti at once!
- Step 1: Find Seeds
You can buy seeds online or from a garden store. Or, if your cactus makes fruit (those little pods after flowering), scoop out the tiny black seeds and dry them for a day.
- Step 2: Set Up the Soil
Use a shallow tray or small pots with a light, well-draining mix—cactus soil or potting soil with extra perlite works great. Moisten it slightly before you start.
- Step 3: Sow the Seeds
Sprinkle the seeds across the soil surface. Don’t cover them—they’re too small and need light to sprout. Press them lightly with your finger so they stick.
- Step 4: Keep It Cozy
Cover the tray with a clear plastic lid or bag to trap humidity—like a mini greenhouse. Place it somewhere warm with bright, indirect light. Check daily to keep the soil moist but not wet.
- Step 5: Wait for Sprouts
Seeds can take 2-6 weeks to germinate, so don’t give up too soon! Once tiny seedlings appear, ditch the cover and let them grow. When they’re a few inches tall, move them to their own pots.
Heads-Up: These babies might not bloom for a couple of years, but watching them grow is half the fun!
Bonus Methods to Try
Cuttings and seeds are the classics, but here are two more ways to propagate if you’re feeling adventurous.
Division
Got a big, bushy Christmas cactus? Divide it when you repot in spring.
- Carefully pull it out of the pot and brush off loose soil.
- Look for natural splits in the roots and gently separate them—use a clean knife if needed.
- Pot each piece in fresh soil, water lightly, and treat them like grown-ups.
It’s instant gratification—new plants, right away!
Air Layering
This one’s a bit fancy but cool for big stems you don’t want to cut yet.
- Pick a stem, make a small slit, or peel back a little outer layer.
- Wrap it with damp sphagnum moss, then cover with plastic wrap to keep it moist.
- In a few weeks, roots will grow in the moss. Cut below the roots and pot it up.
It’s like rooting before you snip—pretty neat, right?

Tips to Make It Work
Here’s what I’ve learned to keep propagation smooth sailing:
- Stay Clean: Wipe tools with alcohol to avoid spreading germs.
- Go Easy on Water: Too much H₂O spells rot—keep it light.
- Boost Humidity: Mist cuttings or use a pebble tray if your air’s dry.
- Take Your Time: Roots and sprouts don’t rush—give them space to grow.
- Label Everything: Trust me, you’ll forget which pot’s which otherwise!
Mistakes to Dodge
Even I’ve tripped up a few times—here’s what to watch for:
- Weak Starting Point: Don’t take cuttings from a sickly plant—they won’t thrive.
- Burying Too Deep: Plant cuttings shallow to avoid rot.
- Crowded Seedlings: Thin them out so they don’t fight for space.
- Light Mishaps: Too much sun burns them; too little starves them. Aim for that bright, indirect sweet spot.
Let’s Get Growing!
Propagating Christmas cacti is pure gardening bliss—whether you’re rooting a cutting to gift a friend or coaxing seedlings into life. Each new plant feels like a little victory, a piece of your original cactus living on. So, grab your tools, pick a method, and dive in! It might not be perfect the first go, but that’s the beauty of gardening—every try gets you closer to green-thumb greatness.
Here’s to more Christmas cacti and more holiday cheer! Happy growing, folks! 🌿🎄